miércoles, 13 de agosto de 2014

How to Use the Tracing Feature in Epicor

When developing this allows you to see the ins and outs when debugging for instance. For this, I recommend using the Tracing feature.
From the main Epicor menu, select the “Tracing Options” icon.
Click “Clear Log”
Ensure that “Enable Trace Logging” is checked.
Click “Apply”
Now anything you do in Epicor, such as searching or updating, will be logged to the selected log file.
To open the log file click the “Tracing Options” icon again and click “View”.
This log shows the background functions and parameters that Epicor uses.
This tool is very useful for developers looking to better understand Epicor and add functionality.

  • Enable Tracing Logging: DataTracer changes from 0 to 4
  • Exclude client processing from method timing: DisablesLegacyTimming changes from 0 t 4
  • Write Full Data Set: DataTraceFullDataSets changes from 0 to 4
  • Track Changes Only: DataTtaceFullDataSets changes from 0 to 3
  • Write Call Context Data Set: (unknown, this doesn't do anything in the config as far as I can tell)

jueves, 9 de enero de 2014

Agregar un campo de una tabla diferente

Esta es una herramienta para ayudarte a agregar un Foreign Key View (FKV) / Sub Table View (STV) a una interfaz de usuario, a fin de permitirte agregar un campo que normalmente no estaría disponible. Aunque nada mas en una table en especifico, tu eres el responsable de "convertirla" a cualquier otra tabla.

1.  Abrir Epicor 9 y seleccionar Options > Developer Mode.
2.  Material Management > Inventory Management > General Operations > Issue Material.
3.  En la venta de customización, marca en cualquier caso “Base Only” o selecciona una customización ya creada. Después selecciona OK.
4.  En la edición de la Forma de "Material", selecciona Tools > Customization.
5.  En la pantalla de customización Tools Dialog, selecciona Tools > Data Tools.

Creando un Foreign Key View para traer de la tabla "Part" entonces necesitamos traer el campo de "Part Warehouse"

Epicor 9 usa“Vistas” no difíciles de leer en las tablas, como se haría en un lenguaje de programación.  En nuestro caso la vista "Parent" (Padre) seria IM (Issue Materials) porque en el caso de los desarrolladores podemos organizar una vista maestra para Issue Materials. Todas las vistas trabajan con "Adaptadores". Entonces en nuestro ejemplo en especifico el "Adaptador de nuestra Parte" se podría utilizar con todas las tablas que relacionen a las partes. En la vista que realizaremos puede manejar diferentes tablas dentro de ella.


6.  Click en “New Custom View” button.
7.  Escribe el nombre de la vista. Noté que la vista no va a estar incluida en “Part”. Tiene un “IM” para “Issue Material”.  El nombre de la vista puede ser cualquiera que tu necesites pero debe de ser un nombre único con el que la identifiques y la podamos manejar en mi caso será IM_Part.
8.  El nombre de la vista Parent (Padre)se va a llenar en automático en el IM.
9.  La View Type se llenará en automático con "Foreign Key View".
10. Selecciona la "Column Name" con "PartNum" que es el primer vinculo para guardar
11. La "Like Column Value" se llenara en automático con "Part.PartNum".
12. El "Adapter Name" se llenara en automático con "PartAdapter".
13. El "Get By Type" también se llenará en automático con "StringGetByID".


14. Click en el botón "Add" y se agregará el "Foreign Key View" después recibirás un mensaje de confirmación. Click en el botón de OK.


Seguido de esto crearemos el "Sub Table View" para que nos traiga la tabla de "PartWhse", que es una vista de la tabla de "Part", y una sub table de la tabla de "Part" (un poco enredado pero así es).
15. Click en el botón "New Custom View".
16. Capturamos el nombre de la vista. El nombre de la vista puede ser cualquiera que tu prefieras pero debe de ser un nombre único con el que la identifiques y la podamos manejar en mi caso será STV_PartWhse.
17. Fijamos el "Parent View Name" que es el que hicimos en el paso 7 IM_Part (nuestro "foreign key View").
18. Fijamos en el "View Type" la opción de "Sub Table View", porque estamos buscando una subtabla de la tabla de "Part".


19. Despues de seleccionar el "View Type", la pantalla mostrará más campos adicionales:


20. El "Link Columns View" se llenara en automático poniendo "IM".
21. Fijamos "Sub Table Name" con "PartWhse", la tabla que usaremos después.


Ahora haremos la configuración de la la tabla "PartWhse" basados en el indice principal de la misma, pues encontrar estos indices en el diccionario de datos de las vistas. En nuestro caso seleccionamos los campos de "Compañia, PartNum, WarehouseCode. Esto solo lo nos mostrara la empresa, numero de parte correcta, guardada en la tabla de "WarehouseCode". No podemos agregar "WarehouseCode" porque este no corresponde con un valor en la tabla de "Part"

22. Fijar "Parent View Columns" (desde la tabla "Part") Con el campo "Company".
23. Fijar "Child View Columns" (desde la tabla "PartWhse") Con el campo "Company".
24. Click en el botón de "Add" que esta justo abajo de "Child View Columns", NO en el que esta hasta abajo. Este agregara el primer link entre las 2 tablas.


22. Fijar "Parent View Columns" (desde la tabla "Part") Con el campo "PartNum".
23. Fijar "Child View Columns" (desde la tabla "PartWhse") Con el campo "PartNum".
24. Click en el botón de "Add" que esta justo abajo de "Child View Columns", NO en el que esta hasta abajo. Este agregara el segundo link entre las 2 tablas.


28. Click en el botón "Add" que esta hasta abajo.  Esto agregara la "Sub Table View".
29. Click en el botón OK.


30. Guarda y Salte de la customización.
31. Salimos de la forma "Issue Material".
32. Re-abrimos la forma "Issue Material" y seleccionamos la customización. 
33. Agregamos una nuevo campo "UD controls".  Ahora tu podrás encontrar el campo que requieres desde la tabla que agregamos, la cual es "STV_PartWhse.OnHandQty".


34. Ahora, puedes traer en "Job" y en el "Mtl" el campo de la cantidad del "On Hand Qty".

Add a field of different table

This is a tool for you to use to help add a Foreign Key View (FKV) / Sub Table View (STV) to a UI form, in order to enable a field to be added that would normally not be available.  Even though it is specific to particular tables, you are responsible for “translating it” to any other tables.

1.  Open Epicor 9 and select Options > Developer Mode.
2.  Material Management > Inventory Management > General Operations > Issue Material.
3.  In the Select Customization window, check either “Base Only” or chose a customization already created.  Then select OK.  The Issue Materials UI opens.
4.  In the Issue Material Form, select Tools > Customization.
5.  In the Customization Tools Dialog window select Tools > Data Tools.

Creating a Foreign Key View to bring in the Part so you can get to the Part Warehouse

Epicor 9 uses “Views” not hard reads on tables as you would in a programming language.  In our case the Parent view will be IM because that is what the Developers setup for the Issue Materials main view.  All views work through Adapters.  So in our example the Part Adapter is used for all things related to parts.  The view can have many other tables in it, such as the Part and the Job views.


6.  Click on the “New Custom View” button.
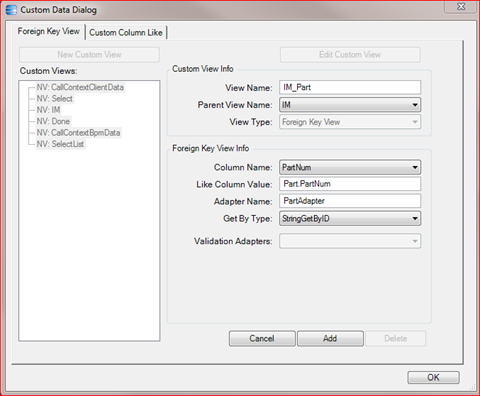
7.  Enter View Name.  Notice that the views do not include “Part”.  They have “IM” for “Issue Material”.  The View Name could be anything you wish to use but you want it to be unique and meaningful so we will use IM_Part.
8.  The Parent View Name will auto fill to IM.
9.  The View Type will auto fill in Foreign Key View.
10. Set Column Name to PartNum which is the primary link to the part record.
11. The Like Column Value will auto fill with Part.PartNum.
12. The Adapter Name will auto fill with PartAdapter.
13. The Get By Type will auto fill with StringGetByID.


14. Click the "Add" button in order to add the Foreign Key View and then you will receive a confirmation message.  Click the OK button.


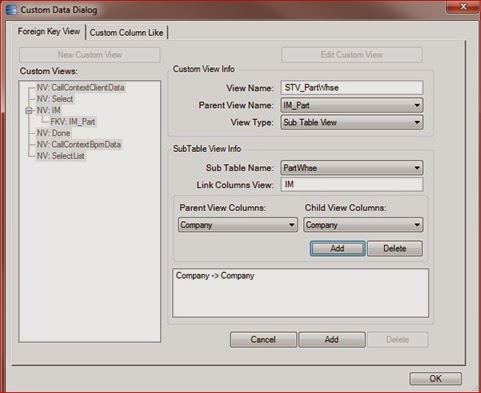
Next we create a Sub Table View to bring in PartWhse Table, which is one of the tables in the Part view, a sub table of the Part table.

15. Click on the "New Custom View" button.
16. Enter View Name.   This could be anything you wish to use but you want it to be unique and meaningful so we will use STV_PartWhse.
17. Set Parent View Name IM_Part (our foreign key View name).
18. Set View Type to Sub Table View, because we are going after a sub table of the Part table.


19. After you select the View Type, the screen repaints with more fields:


20. The Link Columns View will automatically be set to IM.
21. Set Sub Table Name to PartWhse, the table that we are going after.


Now setup the links for the PartWhse table based on that table’s primary index.  You can find the primary index by going into the Data Dictionary Viewer.  In our case we want to add Company, PartNum, WarehouseCode.  This will allow us to only see the correct company and part number records in the PartWhse table.  We can’t add the WarehouseCode because there is no corresponding value to that in the Part table.

22. Set Parent View Columns (from the Part table) to Company.
23. Set Child View Columns (from the PartWhse table) to Company.
24. Click the "Add" button just below the Child View Columns, NOT the one at the bottom..  This adds the first link for the two tables.


25. Set Parent View Columns (from the Part table) to PartNum.
26. Set Child View Columns (from the PartWhse table) to PartNum.
27. Click the "Add" button just below the Child View Columns, NOT the one at the bottom.  This adds the second link for the two tables.


28. Click the "Add" button the bottom.  This adds the Sub Table View.
29. Click the OK button.


30. Save and exit the customization.
31. Exit the Issue Material form.
32. Re-open Issue Material form and select your customization. 
33. Add the new UD controls to the form.  You will now find that you can bind your new field to STV_PartWhse.OnHandQty.


34. Now after to bring in the “Job” and the “Mtl”, it will also fill in the quantity on hand in your new field.